
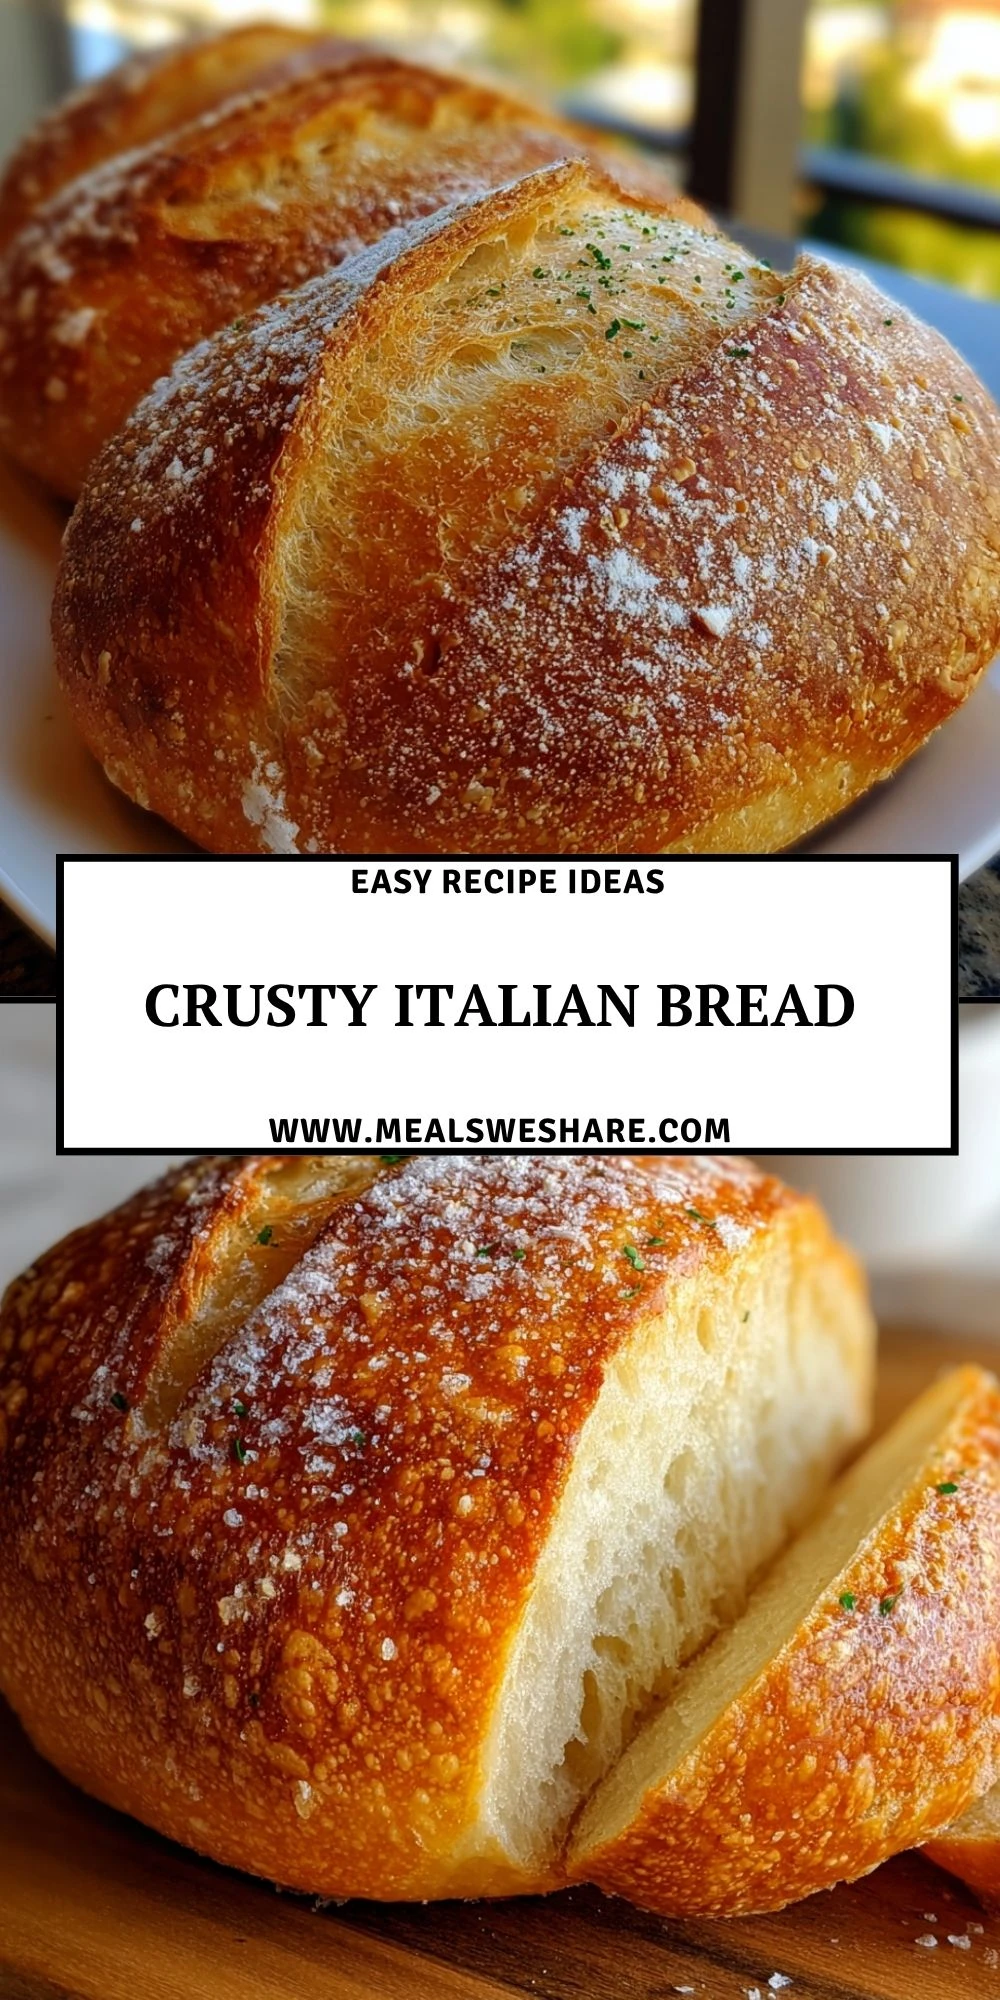
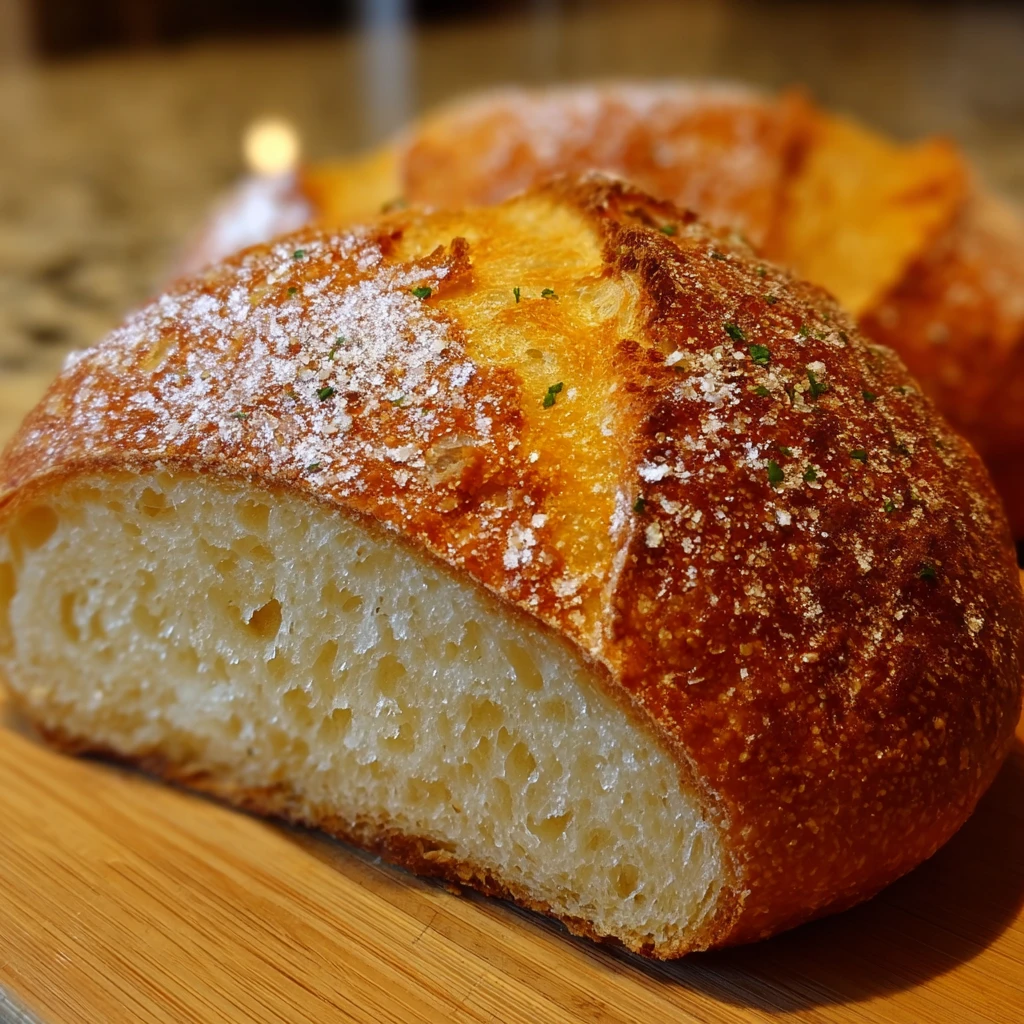
Crusty Italian Bread is the kind of loaf that makes the whole kitchen feel warm before you even slice it. The outside bakes up deeply golden and crisp, while the inside stays soft, chewy, and full of airy pockets that are perfect for soaking up olive oil, soups, sauces, and melted butter.

This bread is simple enough for a weekend baking project but special enough to serve with dinner, pasta night, holiday meals, or a cozy bowl of soup. You only need a handful of basic ingredients, a little patience for rising, and a hot oven to create that beautiful bakery-style crust at home.
Why You’ll Love This Crusty Italian Bread
This Crusty Italian Bread has a rustic texture, a golden crackly crust, and a tender center that tastes fresh and homemade without needing complicated tools. It is the kind of bread that feels impressive on the table but is built from simple pantry staples.
You’ll love how flexible it is. Slice it for sandwiches, tear it into chunks for dipping, toast it for bruschetta, serve it with pasta, or enjoy it warm with butter and a sprinkle of flaky salt. The dough is easy to work with, and once you learn the rhythm of mixing, rising, shaping, and baking, it becomes a recipe you can come back to again and again.
What Makes Crusty Italian Bread So Crisp on the Outside?
The crisp crust comes from high heat, proper dough hydration, and steam during the first part of baking. Steam keeps the outside of the dough flexible long enough for the loaf to expand, then the dry heat finishes the crust into that beautiful golden shell.
A preheated baking stone, Dutch oven, or heavy sheet pan can also help. These surfaces hold heat well, giving the bread a strong oven spring and a more rustic crust. Scoring the top before baking allows the loaf to open naturally instead of splitting unevenly.
Ingredients for the Crusty Italian Bread

Every ingredient in Crusty Italian Bread has a purpose. The beauty of this loaf is that it does not need anything fancy; it depends on balance, time, and a hot bake to build flavor and texture.
Bread Flour
Bread flour gives the loaf structure, chew, and strength. Its higher protein content helps create the stretchy gluten network that traps air and gives the bread its classic Italian-style bite.
Warm Water
Warm water activates the yeast and hydrates the flour. It helps the dough come together smoothly and supports a soft, open crumb inside the loaf.
Active Dry Yeast
Yeast makes the dough rise and adds that gentle fermented bread flavor. It turns a simple mixture of flour and water into a light, airy loaf.
Granulated Sugar
Sugar gives the yeast a small boost and helps the crust brown beautifully in the oven. The bread will not taste sweet, but the sugar supports color and flavor.
Salt
Salt is essential for flavor and dough strength. It balances the bread and helps control the yeast so the rise is steady instead of too fast.
Olive Oil
Olive oil adds a subtle richness and helps keep the inside of the bread tender. It also gives the loaf a soft Italian-style aroma.
Cornmeal or Semolina
Cornmeal or semolina keeps the dough from sticking to the baking surface and adds a rustic touch to the bottom crust.
Flaky Salt and Fresh Herbs
Flaky salt and herbs are optional, but they add a beautiful finish. A light sprinkle on top makes the crust taste savory and bakery-worthy.
How To Make the Crusty Italian Bread
Making Crusty Italian Bread is all about giving the dough enough time to develop flavor, shaping it gently, and baking it hot enough to create that crisp crust. Follow the steps carefully, and let the dough guide you; it should become smooth, elastic, and slightly tacky, not dry or stiff.
Step 1: Activate the Yeast
Stir the warm water, sugar, and active dry yeast together in a large mixing bowl. Let it sit for 5 to 10 minutes, until the surface looks foamy. This tells you the yeast is alive and ready to work.
If the mixture does not foam, the yeast may be expired or the water may have been too hot. Start again with fresh yeast and warm, not boiling, water.
Step 2: Mix the Dough
Add the bread flour, salt, and olive oil to the yeast mixture. Stir until a shaggy dough forms. The dough should look rough at first, with no dry pockets of flour left in the bowl.
Once it comes together, turn it onto a lightly floured surface. Avoid adding too much extra flour, because a slightly tacky dough creates a better crumb.
Step 3: Knead Until Smooth
Knead the dough for 8 to 10 minutes by hand, or about 5 to 6 minutes with a stand mixer fitted with a dough hook. The dough should become smoother, more elastic, and able to stretch without tearing quickly.
A good test is to press the dough gently with your finger. If it slowly springs back, it is ready for the first rise.
Step 4: Let the Dough Rise
Place the dough in a lightly oiled bowl and turn it once so the surface is coated. Cover the bowl with a clean towel or plastic wrap and let it rise in a warm spot for 1 to 1 ½ hours, or until doubled in size.
The timing may change depending on the temperature of your kitchen. A cooler kitchen will need more time, while a warm kitchen may speed up the rise.
Step 5: Shape the Loaf
Gently punch down the dough to release excess air. Turn it onto a lightly floured surface and shape it into a round boule or an oval loaf.
Try not to press out every air bubble. A gentle hand helps keep the inside light and open.
Step 6: Second Rise
Place the shaped loaf on parchment paper sprinkled with cornmeal or semolina. Cover it loosely and let it rise for 30 to 45 minutes, until puffy.
While the dough rises, preheat the oven to 450°F. Place a Dutch oven, baking stone, or heavy sheet pan inside to heat up.
Step 7: Score the Bread
Use a sharp knife or bread lame to make one deep slash across the top of the loaf. This gives the bread space to expand and creates that rustic split in the crust.
Brush the loaf lightly with water if you want extra shine, then sprinkle with flaky salt and herbs if using.
Step 8: Bake Until Golden and Crisp
Transfer the dough to the hot baking surface. Bake covered in a Dutch oven for 25 minutes, then uncover and bake for another 10 to 15 minutes, until deeply golden.
If baking on a sheet pan or stone, place a small pan of hot water on the lower rack for steam during the first 15 minutes. The bread is done when it sounds hollow when tapped on the bottom.
Step 9: Cool Before Slicing
Let the bread cool on a wire rack for at least 30 minutes before slicing. Cutting too early can make the inside gummy because the crumb is still setting.
Once cooled slightly, slice with a serrated knife and enjoy the crisp crust, soft center, and warm homemade flavor.
Serving and Storing Crusty Italian Bread
This Crusty Italian Bread makes 1 large loaf and feeds about 8 people, depending on how thick you slice it. For a dinner table, it works beautifully as a side bread. For sandwiches or toast, you may get 10 to 12 slices from one loaf.
Serve it warm, at room temperature, or toasted. It is excellent with butter, olive oil, garlic spread, marinara sauce, cheese boards, salads, soups, and pasta dishes.
To store it, keep the loaf wrapped in a clean kitchen towel or paper bag at room temperature for up to 2 days. Avoid sealing it tightly in plastic right away, because that can soften the crust. For longer storage, slice the bread and freeze it in a freezer-safe bag for up to 2 months. Toast frozen slices directly from the freezer or warm them in the oven.
What to Serve With Crusty Italian Bread?
Tomato Basil Bruschetta
Fresh tomato basil bruschetta is a natural match for this bread. Toast thick slices, rub them with garlic, and spoon the juicy tomato mixture over the top. The crisp bread holds the topping beautifully without falling apart.
Creamy Soup
A warm bowl of tomato soup, Tuscan bean soup, chicken soup, or creamy vegetable soup becomes even better with crusty bread on the side. Tear the loaf into chunks and use it for dipping into the broth.
Pasta With Red Sauce
Crusty Italian Bread is perfect for pasta night. Serve it with spaghetti, lasagna, baked ziti, or meatballs so everyone can swipe up the extra sauce from the plate.
Olive Oil and Balsamic Dip
For a simple appetizer, pour good olive oil into a shallow dish and add balsamic vinegar, cracked black pepper, herbs, and a pinch of salt. The chewy center and crisp crust make every bite taste rich and satisfying.
Frequently Asked Questions
Can I make Crusty Italian Bread without a Dutch oven?
Yes, you can make Crusty Italian Bread without a Dutch oven. A Dutch oven helps trap steam, but you can still get a crisp crust with a baking stone or heavy sheet pan. Place a small oven-safe pan on the lower rack and pour in hot water when the bread goes into the oven. The steam helps the loaf expand and form a better crust.
For a crispier bottom, preheat the baking surface before adding the dough. This gives the loaf an immediate burst of heat and helps create a rustic texture.
Why is my bread dense instead of airy?
Dense bread usually happens when the dough has not risen enough, too much flour was added, or the yeast was weak. The dough should double during the first rise and look puffy after the second rise. If it feels heavy and tight, it may need more time.
Try measuring flour carefully and avoid packing it into the cup. Bread dough should feel slightly tacky, not dry. Giving the dough enough kneading time also helps build gluten, which creates a better rise and a lighter crumb.
Can I use all-purpose flour instead of bread flour?
Yes, all-purpose flour can work, but the loaf may be slightly softer and less chewy. Bread flour gives Crusty Italian Bread a stronger structure and more bakery-style texture.
If using all-purpose flour, knead the dough well and be careful not to add too much extra flour while shaping. The loaf will still taste delicious, especially when served warm.
How do I keep the crust crisp after baking?
Let the bread cool completely on a wire rack so air can circulate around it. If the loaf sits on a flat surface while hot, steam gets trapped underneath and softens the bottom crust.
Store leftover bread in a paper bag or wrapped in a clean towel at room temperature. To bring back the crisp crust, warm the loaf in a 350°F oven for 8 to 10 minutes before serving.
Can I use this bread for appetizers?
Absolutely. This loaf is excellent for appetizers because it slices well, toasts beautifully, and holds toppings. Try it with tomato basil bruschetta, serve it beside three cheese tomato bruschetta dip, or pair warm slices with creamy parmesan tuscano soup.
Its crusty texture also works for crostini, garlic bread, soup dippers, and rustic sandwich slices.
Save This Pin For Later
📌 Save this Crusty Italian Bread to your Pinterest bread board so you can come back to it any time you want a homemade loaf with a golden crust and soft center.
Let me know in the comments how yours turned out. Did you add herbs on top, keep it plain, or brush the crust with olive oil? Did you serve it with soup, pasta, or a simple dipping oil?
I love hearing how others make these bakes their own. Questions are welcome too, let’s help each other bake smarter. For more daily recipe ideas, visit Meals We Share.
Conclusion
Crusty Italian Bread is one of those simple homemade recipes that feels rewarding every single time. With basic ingredients, a good rise, and a hot oven, you can make a loaf that looks rustic, tastes fresh, and brings comfort to almost any meal.
Serve it warm with butter, turn it into garlic toast, dip it into soup, or slice it for sandwiches. Once you taste that crisp crust and tender inside, this bread will earn a regular place in your kitchen.
Print Crusty Italian Bread
- Total Time: 2 hours 45 minutes
- Yield: 1 large loaf, about 8 servings
- Diet: Vegetarian
Description
This Crusty Italian Bread is a golden, bakery-style loaf with a crisp crust, soft chewy center, and simple homemade flavor that makes every meal feel special. It is an easy recipe for bread lovers, perfect for dinner ideas, soup sides, pasta night, sandwich slices, quick breakfast toast, and cozy food ideas when you want fresh bread from your own oven.
Ingredients
1 ½ cups warm water
2 ¼ teaspoons active dry yeast
1 teaspoon granulated sugar
4 cups bread flour
2 teaspoons salt
1 tablespoon olive oil
1 tablespoon cornmeal or semolina
1 teaspoon flaky salt, optional
1 teaspoon chopped fresh herbs, optional
Instructions
1. Stir warm water, yeast, and sugar together in a large bowl. Let it sit for 5 to 10 minutes, until foamy.
2. Add bread flour, salt, and olive oil. Mix until a shaggy dough forms and no dry flour remains.
3. Knead the dough for 8 to 10 minutes by hand, or 5 to 6 minutes with a dough hook, until smooth and elastic.
4. Place the dough in a lightly oiled bowl, cover, and let rise for 1 to 1 ½ hours, or until doubled.
5. Gently punch down the dough, then shape it into a round or oval loaf.
6. Place the loaf on parchment sprinkled with cornmeal or semolina. Cover loosely and let rise for 30 to 45 minutes.
7. Preheat the oven to 450°F with a Dutch oven, baking stone, or heavy sheet pan inside.
8. Score the top of the loaf with a sharp knife. Sprinkle with flaky salt and herbs if using.
9. Bake covered in a Dutch oven for 25 minutes, then uncover and bake 10 to 15 minutes more, until golden and crisp.
10. Cool on a wire rack for at least 30 minutes before slicing.
Notes
For the best crust, use steam during the first part of baking. A Dutch oven works best, but a pan of hot water in the oven also helps.
Do not slice the bread immediately after baking. Letting it cool helps the inside finish setting and prevents a gummy texture.
If the crust softens after storage, warm the loaf in a 350°F oven for 8 to 10 minutes to bring back its crisp texture.
- Prep Time: 20 minutes
- Cook Time: 40 minutes
- Category: Bread
- Method: Baking
- Cuisine: Italian-inspired
Nutrition
- Serving Size: 1 slice
- Calories: 185
- Sugar: 1g
- Sodium: 585mg
- Fat: 2g
- Saturated Fat: 0.3g
- Unsaturated Fat: 1.4g
- Trans Fat: 0g
- Carbohydrates: 36g
- Fiber: 2g
- Protein: 6g
- Cholesterol: 0mg
Keywords: Crusty Italian Bread, homemade bread, easy bread recipe, Italian bread, crusty bread, dinner ideas, soup side, pasta night, quick breakfast toast, food ideas